Search This Blog

Friday, December 24, 2010

On Her Toes

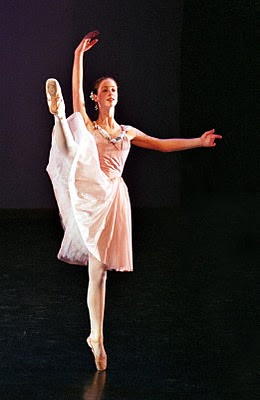
Sometimes you'll be photographing your child on stage, and be surprised to find a truly outstanding image.

Ballerina Megan Maher dances en pointe to Valse Fantasie during Scarsdale Ballet's Spring, 2010 Concert Dance performance at SUNY Purchase, NY (© Michael Maher).

Megan Maher, ballerina, en pointe, on point, Scarsdale Ballet, ballet

The Photo:
Photographing stage performances by your kids can be very difficult. The lighting is rarely adequate to capture the fast-moving activity on stage, and your child is moving around so much it’s tough to keep him/her in focus. My daughter is a ballet dancer, and less than half of her performance numbers have enough light for me to capture good photos. The approach that works best in such situations is twofold – 1) photograph the ones you can when there is ample light, and 2) for those without enough light, use a slow shutter speed and shoot when there is not very much motion. It’s also smart to plan your pictures in advance, asking your kid beforehand where he/she will be entering, standing, moving and exiting the stage, so it’s easy to anticipate, focus and shoot. Take a few close-ups of your kid, and avoid shooting from far away, or you’ll be unable to clearly distinguish your kid from the others on stage. I was lucky with this photo, because I incorrectly set the shutter speed priority on my new digital camera, making every picture but this one blurry. Fortunately, all I needed was this one great shot.

3 Tips:
1) Stage performances are difficult to photograph because the lighting is often low, and the movement very fast.
2) Ask your kid about the performance so you know where he/she will be entering, standing, moving to, and exiting.
3) Be sure to take some close-ups of your kid and avoid taking crowd pictures of the stage from too far away.

Friday, December 10, 2010

Rogers Wins 1979 Boston Marathon


If you photograph a road race, shoot the winner breaking the tape and crossing the finish line.

This shot was just used as the cover of a Bill Rodgers autobiography.


Bill Rodgers grimaces as he breaks the tape to win the 1979 Boston Marathon (© Michael Maher, The Lowell (Ma.) Sun).

Bill Rodgers, Boston Marathon, Patriot's Day, Boston Billy, 1979 Marathon finish, Boston Marathon finish line

The Photo:
In Boston, the third Monday in April is always a special day – the running of the Boston Marathon, the world’s oldest continuously run marathon, on Patriot’s Day, a Massachusetts state holiday celebrating Paul Revere’s ride. In 1979, local schoolteacher Bill Rodgers was the most consistent winner in marathoning, and heavily favored to triumph again. I formulated my shooting game plan, beginning with the start in the small hamlet of Hopkinton, Ma. and driving the 26 miles to the finish to photograph the winner. I didn’t want a seat on the flatbed press photographers’ truck that stays slightly ahead of the leader throughout the race because the truck has to veer off near the crowded finish, and the photographers riding sometimes miss capturing the winner at the finish line.
At the start, I climbed a tree about ¼ mile down a hill to capture the sea of runners coming down and filling the road. Slightly before the race began, another photographer pulled up in a cherry picker and set it up to dangle him over the road where the runners would run under him. Just before the starting gun went off, he lowered the cherry picker, but kept it just out of my and other photographers’ lines of sight, so we got our pictures.
After speeding by car to the finish, I climbed an elevated bridge facing the finish line, and shot a determined, grimacing Bill Rodgers breaking the tape, clutching the stocking cap that had kept him warm on this cool day. The finish scene was chaotic, and I couldn’t get down from the bridge in time to photograph Rodgers getting his medal and celebrating. I then understood why some news organizations sent several photographers, because it was so tough for one person to cover everything alone.

3 Tips:
1) For races, photograph the leaders or winners crossing the finish line.
2) Watch for strong intensity in the runners’ faces or an emotional reaction after the finish.
3) If possible, photograph action early in a race, and also make it to the finish line in time.

Wednesday, November 24, 2010

Newborn Lineup

You really can successfully photograph a group of infants, even if they can't sit up by themselves.

3-month olds pose for a group photo during a parental Lamaze class reunion (© Michael Maher).


The Photo:
All the families from our Lamaze birthing class got together for a reunion to show off their babies. I knew if I could put all the babies together, it would make a very warm and powerful group photo. Fortunately, this sofa was the perfect width to fit all the kids side-by-side. The biggest challenge was they couldn’t sit up by themselves, so we had to lean them back just a bit to keep them from falling forward. That didn’t necessarily prevent them from falling sideways, so we kept adjusting them after one or two tipped onto another. The first time we had the picture lined up, the kid on the far left, my daughter Colleen, reached out and touched the baby next to her, and they all tipped sequentially like dominoes. During the few brief moments the kids stayed upright, I took several photos, and this was the best.

3 Tips:
1) Group photos of infants are challenging because they cannot hold themselves upright and they don’t interact with one another.
2) Leaning them or bracing them against something enables them to pose facing the camera.
3) Make some noise or call them, and shoot several photos quickly before any of them become sad or fall over.

Saturday, November 20, 2010

Rejecting the Doctor

If you know the sports shot you want, plant yourself in the best location, be patient, and you'll usually get it.

Boston Celtic forward Kevin McHale blocks shot by Philadelphia 76ers forward Julius Erving (“Dr. J”) during NBA game won by the Celtics (© Michael Maher, The Lowell (Ma.) Sun).


The Photo:
The Celtic teams of the 1980s were led by their Hall of Fame frontcourt; center Robert Parrish, along with forwards Larry Bird and Kevin McHale. McHale was known for his tough inside play, where he consistently scored, rebounded and blocked shots, helped by his famously long arms. The Philadelphia 76ers were the Celtics’ fierce rival in the NBA’s Eastern Conference, and every game of the season was important in deciding who would finish first and gain playoff home court advantage. The defense in this game was tough by both teams, so I shot from a sideline spot near center court, trying to capture the defensive intensity with photos of steals or blocked shots. By sitting here, I could see the faces of the defenders as the offensive players drove at them. However, I couldn’t anticipate the plays very accurately, and instead focused on the players most likely to make strong defensive plays. For awhile, I kept my camera trained on McHale playing defense, and when Philadelphia’s Julius Erving (“Dr. J”) drove to the basket, McHale leaped high in the air to knock the shot away, and I had my picture.

3 Tips:
1) Midpoint on the court allows you to photograph defenders’ faces and defensive action at both ends of the court.
2) Concentrate on the players most likely to make defensive plays.
3) Use a 105MM or 180MM lens, depending on how tight you want the shot to be.

Friday, November 12, 2010

Jumping for Joy

This award-winning photo shows powerful foreground emotion, symmetrically framed by players in the background each raising their arms in a "v" for victory.

Little League Pitcher Davey Lyons jumps off the mound in victory as left fielder Mike Moriconi, left, and shortstop Gary DiSarcina, right, join in, raising their arms in victory after their Billerica (Ma.) National team won a Little League Tourney game 7-4 over Andover (Ma.) National (© Michael Maher, The Lowell (Ma.) Sun).


The Photo:
So far, none of the photos I had taken fully captured the intense happiness, excitement, and emotion of the local Billerica players and fans at this regional Little League Tournament game. The players were jumping for joy, the parents were cheering avidly, and most of the spectators were yelling in support. When the last pitch was about to be thrown, I squatted down on the first base line to keep the sunlight behind me and take advantage of a clean background of trees. Using a 180MM lens and a shutter speed of 1/500, I concentrated on photographing a reaction shot from their star pitcher, who had been very animated and emotional throughout the game. The game ended as the last opponent struck out, and the winning Billerica team went crazy with joy, celebrating wildly. The pitcher leaped high into the air and was perfectly framed between the left fielder and shortstop, who both raised their arms in a “v” for victory sign. The pitcher’s arms went out of my viewfinder briefly when he leaped, so I almost missed the photo, but by waiting for the pitcher’s ecstatic, full-body leap to be in the center, symmetrically framed by his teammates, I got the picture. The shortstop, Gary DiSarcina (R), later played for the Anaheim Angels and the Boston Red Sox.

I was very fortunate both fielders raised their arms in victory and stood in the perfect spots to frame the happy pitcher. Several years later, at a college baseball game, I saw this photo again, and lined up the shot the same way. This time, however, the pitcher looked away when he cheered, while the player on the left ran out of my frame. While we can line up a potential photo, we can’t control whether the players react perfectly to create the best possible image.

3 Tips:
1) Emotion photos are usually far better than action photos.
2) Focus on the most emotional, expressive player.
3) Position yourself and aim your camera to get the best lighting and background before the moment and photo occur.

Saturday, November 6, 2010

Topsy-Turvy Soccer Toss

Adding an average spectator contrasts and further accentuates this upside-down athlete.

A spectator seems unimpressed as Wilmington player Kevin Bagrowski does a flip with the ball to get extra distance on his throw-in during high school soccer match vs. Billerica (© Michael Maher, The Lowell (Ma.) Sun).


The Photo:
The high school soccer player took a running start, flipped over, bounced off the ball, and as he came upright, made a long inbounds toss, but this wasn’t a strong picture by itself. The photo needed someone upright nearby to create a clear contrast, make the picture more interesting and add some element of amusement. When he attempted his next upside down throw-in, I backed up and saw this fan who was a perfect counter to my upside down player, and his lack of reaction helped make the photo a winner. Judge for yourself – if you crop out the spectator, it is nowhere near as powerful.

3 Tips:
1) Watch for action that seems to defy gravity.
2) If you miss a shot, plan out how you will be ready next time there is an opportunity.
3) Look outside the field of action for elements you can add to make your photos stronger.

Friday, October 29, 2010

His Master's Finger

Finding the right shooting angle lets you selectively exclude elements from a photo, and make it far more compelling.

“Stay,” says the dog’s master with his finger, and the dog obeys, outside the Tewksbury, Ma. Middle School (© Michael Maher, The Lowell (Ma.) Sun).


The Photo:
Kids’ relationships with their pets can provide both warm and humorous pictures. After searching fruitlessly for over an hour seeking a feature picture, I entered the parking lot of a local school to turn around and reverse direction. I spotted a dog sitting outside the school’s rear door, with the arm of the dog’s owner pointing out the back door telling the dog to “stay”. I immediately thought of the famous picture of the RCA dog cocking his head at the sound of his master’s voice coming from the phonograph (“His Master’s Voice”). In this case, the dog seemed to be devotedly obeying the arm and finger, not the voice, of its master because, from my vantage point, all I could see was the dog sitting obediently as its master’s hand protruded from the door pointing “stay”. Had I been viewing this from another angle, like in front of the school door, I would have merely seen the back of the dog and face of the owner, which would be far less interesting. Leaving out most of the owner’s body, except his arm and finger, made the picture far more effective. I shot a few variations of this scene, and came away with a pretty unique photo (later an award-winner), which seemed to require the title, “His Master’s Finger”.

3 Tips:
1) Children with their pets provide a range of interesting picture possibilities.
2) The angle from which you view a scene can determine whether it is a strong photo or not.
3) Omit elements you would normally include to sometimes make your photos more unusual and compelling.

Thursday, October 21, 2010

We Need Help -- Now!

A sign can be a valuable prop when it conveys a humorous meaning to the activity in your photo.

These two shovelers weren’t the only ones who needed help when winter’s first storm dumped six inches of snow on the ground. Barry Meuse, left, and Rich Silk do their best to clear the driveway of the gas station where they work on Rte. 38 in Lowell, Ma. (© Michael Maher, The Lowell (Ma.) Sun).


The Photo:
A good photographer always keeps his or her eyes open for humor, and one approach is using signs that convey a funny meaning to what’s going on. This photo jumped out at me as I drove along on a very snowy evening, and I spied two gas station workers shoveling the entrance to their station next to a “We Need Help” sign designed to attract new employees. These two shovelers definitely needed help that night, and when I saw this shot, the only way I could photograph it was with a flash, for it was too dark to shoot otherwise. The heavy snow also meant the light from my flash wouldn’t travel as far, so I had to shoot from closer up. The sign made the picture far more interesting than it would have been with just two people shoveling snow.

3 Tips:
1) Inclement weather photos are almost always newsworthy.
2) Use signs to make your photo stronger by conveying an alternative meaning to the activity in the picture.
3) If you need a flash to take a bad weather photo, position yourself close to the subject because the light from the flash won’t travel as far as usual.

Friday, October 15, 2010

Remembering John Lennon

When crowds of people publicly display their emotions, it can provide very powerful photo opportunities.

Hundreds of thousands of people flocked to mourn slain Beatle John Lennon during a 10-minute silent vigil in New York’s Central Park, while some also surrounded Lennon’s home, the Dakota, where he had been shot by an alleged fan (© Michael Maher, The Lowell (Ma.) Sun).


The Photo:
Like many people, I first heard about John Lennon’s death when ABC Monday Night Football broadcaster Howard Cossell interrupted a game to inform football viewers. When a 10 minute silent vigil was held the following Sunday in New York City’s Central Park, journalists had to canvass the entire Central Park and adjacent areas to capture the expected outpouring of emotion because the best, most moving photos could conceivably be found anywhere. Starting at the Dakota where Lennon was slain, I encountered an enormous crowd of mourners surrounding it, (didn’t they know they were supposed to be in Central Park?) and it took quite awhile to wade through the people and realize the most compelling photo there was the immense crowd surrounding his famous residence. Proceeding to Central Park, I slowly walked through the masses looking for images and people to convey the day’s feeling of sadness. At the front of the crowd, it’s easier to find close-up, emotion pictures in such a mass of humanity. I discovered people with touching signs (“Imagine John Lennon Lives”), but the strongest pictures came when the official 10 minute silent vigil started, and people in front began sobbing and consoling one other. It can be difficult to find great photos in the midst of a large crowd, so I was fortunate the best pix were right up front without any obstruction. At this type of event, look for all three types of photos -- overalls (the large crowds near Lennon’s Dakota residence), mediums (mourners holding up signs), and close-ups (fans weeping and consoling each other).

3 Tips:
1) Photograph the three major types of photos – overalls, mediums, and close-ups – at crowded public rallies, to get a wide variety of pictures.
2) Canvass the whole area because you can find strong photos almost anywhere.
3) The most reliable place to look for emotional photos is at the front of a large crowd because your view is unobstructed and the most passionate attendees usually push to the front.

Friday, October 8, 2010

Bucky Dent's Home Run & Sad Yaz

Sometimes you can't get the shooting position you want but end up in the best possible spot.

New York Yankees shortstop Bucky Dent, left, is greeted at home by teammates Chris Chambliss, center, and Roy White after scoring ahead of Dent’s three-run, seventh inning homer that put the Yankees ahead for good in their 5-4 victory over the Boston Red Sox in the 1978 AL East Playoff Game at Boston’s Fenway Park (© Michael Maher, The Lowell (Ma.) Sun).

Buckey Dent Home Run 1978 Playoff Yankees vs. Red Sox by Michael Maher

Boston Red Sox star Carl Yastrzemski sits disconsolately in the clubhouse after popping up in the ninth inning to end the game with the tying and winning runs on base during Boston’s 5-4 loss to the New York Yankees in the 1978 American League East Division playoff game at Fenway Park (© Michael Maher, The Lowell (Ma.) Sun).

Sad Carl Yastrzemski of Red Sox after popping up to end 5-4 playoff loss to NY Yankees in 1978 by Michael Maher

The Photos:
This was the deciding game of the greatest baseball pennant race ever, the 1978 American League East battle between the New York Yankees and the Boston Red Sox, a one-game playoff at Boston’s Fenway Park to determine which of these teams would go on to the playoffs. However, with scores of TV and still news photographers covering the event, there was no room in the only field-level photographers’ pit by first base, adjacent to the Red Sox dugout. Since I couldn’t get the photographers’ normal shooting position, I moved to the third base side to have the sun over my shoulders for the best lighting, at the front of an aisle, adjacent to the field, behind the Yankees’ on-deck circle. Now I had the advantages of better lighting, a different vantage point from nearly everyone else, and a more comfortable spot since other photographers weren’t crowding me. The only risk was I could miss a photo or angle that all the other cameramen got.
This game would be a great story, no matter who won. If Boston won, they would successfully end their archrivals’ season-long comeback attempt from a 14½ game division deficit, but if the Yankees won, it would be the greatest baseball comeback of all time.
In the 7th inning, the Yankees, trailing 2-0, had two runners on base when Bucky Dent, their weakest hitter, came to bat. He fouled a ball off his shin, and the trainer came out to check his leg, while a teammate handed Dent a new bat. Oddly, Red Sox pitcher Mike Torrez didn’t warm up during the long delay, which risked making his pitches more hittable. When the weak-hitting Dent stepped back into the batter’s box, he hit Torrez’ first pitch, a fly ball that became a home run in Fenway’s short left field. I had a perfect angle on the celebration of a season-changing hit, and one of the most famous home runs in baseball history. Roy White and Chris Chambliss, who were on base and scored, greeted Dent at home, and the score was now 3-2 Yankees. This photo told the story of the game from the Yankees’ point of view -- their weakest hitter being congratulated for a homer that put them ahead for good. With the sun over my shoulder, I had a clear, well-lit photo of Dent’s homer, while most other photographers were on the first base side, shooting into the sun and couldn’t get as good a picture.
The Yankees went further ahead and the Red Sox rallied, but New York won 5-4 as Boston captain Carl Yastrzemski (“Yaz”) popped up to end the game with the tying and winning runs on base.
The Boston side of the 1978 playoff story could be seen in Yaz’ sad face after what he described as the most disappointing moment of his career. For Boston fans, this was the key photo that summed up the game, and nearly every Boston-area newspaper published some version of this on the front page. The Yankee perspective is best seen in the elated faces of Dent, Chambliss, and White. While I shot many compelling photos of game action, as well as the Yankees hugging and celebrating after the final out, this photo said it all. Combining the photo of Dent’s homer with the shot of a disconsolate Yaz told the full story, from both the winner and loser perspectives.

3 Tips:
1) Photograph both the winner and loser’s emotional reactions.
2) Close-ups of key participants convey the emotion of the moment and tell the story.
3) Be confident enough to position yourself with the sun over your shoulder, no matter what other photographers do.
Friday, October 1, 2010

A Wink and a Puff

Look how a facial expression or gesture can bring your subject's personality to life.

John Creatch shows his personality with a wink and a cigar puff in Malden, Ma. (© Michael Maher).


The Photo:
I was photographing a reunion for residents of the Edgeworth section of Malden, Ma., which I expected would be boring photos of people standing and chatting, or posing in groups around tables. I shot several photos of people interacting and most were indeed rather boring group shots. One man asked me to take his picture, but I expected nothing special, just a headshot of this one attendee. However, as I aimed and began shooting, he winked and took a puff on his cigar. When I shot several photos, he commented, “There, that should be good enough to get me in the newspaper,” and he was right. It was a great personality shot, and by far the strongest picture I got that night. Sometimes the subject provides everything you need to capture his/her personality – in this case it was both the wink of his eye and the cigar as an important prop.

3 Tips:
1) Give a subject the opportunity to express his/her personality.
2) At large gatherings or events, look for close-up facial personality photos.
3) In addition to a compelling facial expression, sometimes add a physical prop to convey more about the subject’s personality.

Thursday, September 23, 2010

"Duke" on the "T"

If you spot a famous person doing an ordinary thing, it can make a newsworthy photo that news outlets will pay to use.

Governor Michael Dukakis rides the Boston subway (the “T”) to work at the Ma. State House during the Blizzard of 1978, when over 20 inches of snow fell on Boston and closed the city for almost a week (© Michael Maher).


The Photo:
Years before he became the Democratic candidate for President, Ma. Governor Michael Dukakis was even then a modest, unflashy personality. I was riding the Boston subway (the “T”) with some friends during the infamous Blizzard of ’78, when I spotted him in the train car ahead of me. When the train stopped at the next station, I jumped out and shot several photos of him through the train window as he read his newspaper among the heavy crowd, never looking up as passengers pushed and shoved to get on. No one even spoke a word of recognition to him, which was how he liked it, as he took the “T” to his office at the State House. I was lucky to happen upon him, but prepared enough to have my camera with me, which I learned early-on that a photographer should always keep handy. This was a humorous photo of a famous politician because few Massachusetts residents imagined their Governor riding the subway to work with thousands of ordinary commuters.

3 Tips:
1) Look for photos of famous people or high government officials doing normal day-to-day activities.
2) The best photos show them not looking special but being very normal and unassuming.
3) Keep your camera with you whenever possible so you are always ready for this type of unexpected photo opportunity.

Friday, September 17, 2010

Bucket Basketball

Kids can be so clever and imaginative that sometimes all you have to do is shoot exactly what you see them doing.

James Cullen, left, tries to can a jumper over his friend David Dion as they improvise a game of basketball using a bucket, rope, and a ball in Lowell, Ma. (© Michael Maher, The Lowell (Ma.) Sun).


The Photo:
I accidentally came upon this photo while enroute to another event. These two boys created their own basketball equipment out of a bucket and a piece of rope, rather than walk all the way to a playground to find a real basketball hoop. They were very intense about their play, and only slowed down to retrieve the ball from the bucket when one of them made a shot. It was a creation very much like Dr. Naismith’s original peach basket. I stopped and used a long lens to shoot their play, so they barely noticed my presence as I photographed them from just across the street. They shot, jumped and rebounded aggressively, as if there was a lot at stake, and it made for a great picture when they treated this makeshift basket like a real one.

3 Tips:
1) Seek out photos of kids inventing new, creative ways to play.
2) Capture the physical intensity and body extension of kids when they are playing sports.
3) Watch for emotional facial expressions to make photos of physical feats even more powerful.

Thursday, September 9, 2010

S-T-R-E-T-C-H

See how shooting from just the right angle makes an impossible physical feat look real.

A young boy appears stretched across the car as his head emerges from one side and his brother’s feet from the other in Lowell, Ma. (© Michael Maher, The Lowell (Ma.) Sun).


The Photo:
I watched two boys playing energetically in a parked car for several minutes as I tried to imagine the best possible picture. Initially I couldn’t envision any particularly high potential photo opportunity, so I didn’t even take out my camera. Suddenly, one kid stuck his head out of the passenger window and the other hung his feet out of the driver’s side. For that split instant, you couldn’t clearly see the two separate bodies, and it looked like one kid was stretched horizontally across the entire car. The kids quickly moved on to other play, but that previous moment sparked a photo idea. I pulled out my camera and long lens, staying at a distance, but waited in vain as the moment did not reoccur. Finally, I walked up, asked them to do it again, stood further back framing the photo, and crouched down until the entire rear window was so dark you couldn’t see the shapes that revealed it was two kids, not one.

3 Tips:
1) Be patient to watch kids playing for awhile because they often provide completely unexpected photo opportunities.
2) If you miss a great photo moment, it’s OK to set the subjects up and ask them to do it again.
3) Use different angles or lighting to create additional effects or hide undesired details.

Thursday, September 2, 2010

Mirror, Mirror

Let's look at how mirrors and reflections can add a whole new dimension of creativity to your photos.

Jonathan McBride (L) watches as Scott Meissner applies makeup backstage during “That’s Entertainment”, a variety show at the Locke School in Billerica, Ma. that raised money for fighting leukemia (© Michael Maher, The Lowell (Ma.) Sun).


The Photo:
Photographing a local school variety show, I looked for something in addition to the usual shots of kids on stage. I found performers putting on makeup backstage, with one boy intently watched his friend. I noticed the mirror and looked for an unusual angle or perspective for my photo. Reflections can help portray simple activities and interactions with an unusual and creative vantage point, but be sure you shoot from multiple angles, while keeping your own reflection out of the photo. I initially considered photographing only the kid applying makeup, either from the back with his face showing in the mirror, or from the side so you could see both his face and reflection side-by-side, but these were rather ordinary. When I saw that the mirror created a unique angle, simultaneously showing both the face of the kid applying makeup and the one watching, I knew this was a powerful shot.

3 Tips:
1) Mirrors and reflections provide a great opportunity to creatively portray simple interactions and activities.
2) Try photographing from a range of angles and perspectives, but be sure to keep your reflection out of the picture.
3) Be so creative that people will wonder how you took the photo.

Friday, August 27, 2010

Alone At Last

Body language often makes for a powerful picture, as in this example of a loving couple in a lonely stadium.

Couple exchanges long, loving look against background of empty stadium prior to Olympic Festival in Durham, N. C. (© Michael Maher).


The Photo:
Arriving early for a track meet at Duke University stadium, I was assessing the shooting angles, backgrounds, and levels of sunlight at the football stadium. There were scarcely any spectators in the stands, but I spotted a couple walking around together, hand-in-hand, looking for seats. I watched on and off as the man and woman slowly climbed the stairs to the middle of the empty seating section and sat down. They looked amorously at each other, began to hug, kiss, and I noticed how alone they were in their section of seats. Though I shot several close-ups of them interacting (feeling a bit like a voyeur), it was clear the more interesting visual would show them alone in the row after row of empty horizontal benches surrounding them. It was funny to see a couple finding solitude in such a public space. The only question was where to place them in the frame of the picture --- top, middle, or bottom. Since it is never good to place subjects in the middle and make a picture too symmetrical, I framed them at the bottom of the photo, so the viewer’s eye would go to the seemingly endless rows of empty bleachers first and then to the couple.

3 Tips:
1) Not all portraits and personalities are close-up facial expressions – some can be shot from afar if they convey human interaction.
2) People can express love and affection in a number of different ways, often through body language.
3) Photo composition is more interesting if it is not symmetrical – place the main subject to the side, top or bottom, but not in the center.

Thursday, August 5, 2010

“You Can’t Tell That Guy Anything”

This week I'm sharing three photos because I won't post while I am on vacation for the next few weeks. Here a sports official and coach spar very heatedly, creating powerful expressions and body language.

Boston Celtics player-coach Dave Cowens argues too forcefully and is ejected by NBA referee Richie Powers during the fourth quarter of this season-ending game at the Boston Garden (© Michael Maher, The Lowell (Ma.) Sun).


The Photo:
This was the last home game of a very disappointing season for the Boston Celtics, as they missed the playoffs for the second consecutive year. The only reason I photographed this game, which would have no effect on the standings, was to get a picture of Celtic #1 draft pick Larry Bird who attended the game in Red Auerbach’s courtside seats with his agent Bob Woolf. Photographers swarmed around Bird to shoot pictures of him with Auerbach, but nearly all departed when Bird left early. I chose to remain for the game’s completion, looking for an emotion shot or unusual angle, and positioned myself between the two teams’ benches. After a questionable foul call against Boston, an infuriated Celtics’ player-coach Dave Cowens jumped off the bench and began jawing with referee Richie Powers. They yelled, bumped, got more and more irate, and Cowens was ejected. I was perfectly positioned for the entire confrontation between Cowens and Powers. I had so many good shots of their emotional discussion, it was difficult to select the best pictures. These photos later won many awards, but the big story from the game was Larry Bird’s first Boston visit, so the mundane photo of Bird was displayed large on the newspaper front page, while the phenomenal Cowens shots ran small inside.

3 Tips:
1) Confrontations with officials provide terrific displays of emotion and facial expressions.
2) Periodically position yourself near the player benches, especially when a coach is animated or agitated.
3) Stay alert and ready to shoot because this type of photo op is often very spontaneous and unexpected.

Saturday, July 31, 2010

Double Play

Here's one multiple exposure technique to have fun with, called Open Flash.

Megan Maher, 12, appears annoyed by her twin image in Chappaqua, N. Y. (© Michael Maher).


The Photo:
The Open Flash technique makes it easy to combine multiple images of the same subject, using outdoor or indoor darkness. Electing to shoot at night, I put my camera on a tripod, set the shutter to the manual setting B, and connected a cable release. After positioning my daughter Megan on one side of the viewfinder, I pressed the cable release to hold the shutter open in the dark, and fired the flash. While continuing to hold the cable release to keep the shutter open, I moved her to the other side of the frame and fired the flash again. I then released the shutter, and came away with a single photo of Megan’s multiple images. Megan helped make the photo much more interesting by appearing to react to her other image. You can enhance this type of photo further by changing the subject’s clothing or even adding a third image.

3 Tips:
1) Open flash is an easy use of outside or indoor darkness to create a multiple exposure photo.
2) Keep the camera still by putting it on a tripod and using a cable release.
3) Place your subject and fire the flash, then move the subject and fire the flash again, to create multiple images in the same frame.

Saturday, July 24, 2010

Up And At 'Em

The pole vault is a terrific sport to photograph, especially when you can capture the dramatic bend in the bar.

Pole vaulter bends his pole at an almost 90 degree angle on his way to clearing the bar at 18 feet during the U. S. Olympic Festival in Durham, N. C. (© Michael Maher).


The Photo:
Shooting the pole vault lets you capture the athletes’ tremendous body control and concentration as they hang on to the long pole, fly 15-20 feet into the air and land correctly onto a small cushion. What’s also amazing from a photographer’s perspective is how much the pole actually bends when the vaulter first plants it and rises into the air. I’ve seen other photographers capture this in many different ways, from overhead so the pole looks almost bent in half, and in front when the vaulter grimaces while hanging onto the bent pole, eyes riveted on the bar. I didn’t recall ever seeing a photo taken from the side accentuating the bent pole, and providing a close-up of the vaulter so you can see his expression. At this track meet, I stayed by the side of the event and shot nearly all the competitors. It was a tough shot to get --- using a long lens I stood back a significant distance, patiently waiting as judges, coaches, and players walked in front – but I timed this shot just right to capture the vaulter in mid-flight.

3 Tips:
1) The pole vault is a very acrobatic sport and makes for great pictures.
2) Photograph the athlete in the air on the way to going over the bar.
3) Try to capture the extreme bend in the pole to make the photo stronger.

Saturday, July 17, 2010

"Gotcha!"

Getting a sports picture of your kid can be a bigger challenge than shooting professionals!

Colleen Maher, right, of the Tigers, shouts for joy as an Aggie opponent is out at first base during the opening game of the New Castle, N. Y. girls’ softball season, while her teammate Beth Gladstone also cheers (© Michael Maher).

girls softball, kids softball, out at first base, softball second baseman

The Photo:
When you’re trying to shoot a great sports photo of your kid, it can be harder than photographing a major leaguer. Usually, young kids are more likely to show emotional reactions more often, and on more routine plays, than adults and older players, but there were two challenges in this game. First, it would be difficult to find an emotional reaction because the softball game was a blowout, there was no doubt about the winner, and the players just wanted the game to be over. Second, I wanted to photograph my daughter Colleen, who was a participant, but she constantly hid her face because she was self-conscious whenever my camera pointed her way. Several times I tried, but was unable to get, a good photo of her playing because she wouldn’t relax to show her natural emotions and reactions. Nevertheless, I persisted because she was beginning to tolerate and ignore me. Standing on the first base line, I alternated between photographing her batting and fielding during this game when her team was getting beat very badly. The last thing I expected was a strong emotion or reaction, but on a grounder to second, her teammate threw the runner out on a close play at first to end a long inning, and Colleen unexpectedly cheered the out with body English, emotion, and an intense facial expression. At that moment, I was pointing my camera on another player, but as I heard Colleen yell “yeah!” I turned, quickly pointed my camera at her, without time to fully look through the viewfinder, and took what was a great picture. I submitted it to our local newspaper, and when it was published, all Colleen’s friends and teammates got to see her in print. While I felt proud I had given my daughter a few minutes of fame in her hometown, the big benefit for her was I would stop stalking her with my camera during her games.

3 Tips:
1) Watch the fielders during the game, especially with no runners on base.
2) Focus on players most likely to show emotion or ones you want most (e.g., your kid).
3) Be ready to react quickly to something unexpected.

Friday, July 9, 2010

A Winning Smile

When taking a portrait, try to identify and capture a subject's unique features and personality traits.

Candidate Elmer Bussey flashes a smile while displaying a bumper sticker with his campaign slogan advertising his 13th run for New Hampshire governor, in Pelham, N. H. (© Michael Maher, The Lowell (Ma.) Sun).


The Picture:
I was scheduled to photograph Elmer Bussey, who was in the midst of his 13th run for governor of New Hampshire. Before meeting him, I learned that the candidate was missing some teeth, and the moment I met Bussey, I saw that his unique smile would convey his personality and create a terrific photograph. I didn’t want to tell him my plan and make him self-conscious about smiling, so I lined up a portrait against a clean, simple background, as he held up his campaign bumper sticker (“No New Taxes”). We joked around -- he was a very friendly man -- causing him to laugh and break into a wide smile. I stood back with a medium-range lens, close enough to converse, but far enough back so his face stood out prominently from the background. His wide grin gave me the powerful, winning personality photo I was looking for. Bussey was a very nice man and most people would agree with his campaign slogan, but he didn’t win the election.
(It was a great shot, but I realized later that having him stand, arms folded, next to the Bussey sign, would have more clearly conveyed that HE was the candidate.)

3 Tips:
1) A broken smile or missing teeth creates a very strong picture of both adults and children.
2) Photos are much stronger when combining a strong expression with elements that depict the person’s occupation, significance, or accomplishments.
3) Frequently you need to interact with your subject in a way that coaxes an expressive reaction.

Friday, July 2, 2010

Right Where it Hurts

Soccer is a wonderful sport to photograph because it is played outside in the bright sunlight, and you can clearly capture players’ intense facial expressions as they kick, head the ball, or collide.

Lawrence soccer player grimaces in mid-air as he is hit by a kick from a Billerica opponent (© Michael Maher, The Lowell (Ma.) Sun).


The photo:
This was a mid-season high school boys’ soccer game, and I already had several good action shots, but was hoping for something outstanding. Standing near midfield, I started looking for tight, close-up shots with intense facial expressions. Suddenly, right in front of me someone went high in the air to block an opponent’s kick, and recoiled as the ball hit him. It was so close to me when I fired the camera that I almost couldn’t see the whole image, although I knew I had a good expression. Making the picture even better was that the ball clearly hit him in the crotch, which was what made him grimace so much.

3 Tips:
1) Soccer kicks and collisions are among the best soccer action photos.
2) To get great soccer action, follow the play up and down the sideline.
3) Always strive for intense facial expressions.

Saturday, June 26, 2010

Sky Driver

A silhouette photo portrays a subject's very dark shape against a bright background. Let's take a look at how it is done.


Playground basketball player Joseph Kaplan is silhouetted as he drives for the hoop in Malden, Ma. (© Michael Maher).

The Photo:
I watched a lone player shooting baskets on a playground, and tried to come up with a way to make such a mundane activity visually interesting. The setting sun in my eyes gave me the idea to create a silhouette of the player laying the ball into the basket. As the sun set, it minimized the light on the playground and my basketball player, but still maintained a bright sky, so I lay on the ground under the basket and used the sky as my background. A silhouette requires a background approximately four times (two f-stops) brighter than the foreground. To make this a great picture, I needed the player’s arms and legs to be fully extended, creating a silhouette that clearly outlined all the key body parts (head, torso, two legs, two arms, etc.). It was challenging for me to fit him, the ball, and the basket into the frame, but he had the toughest job, for he had to simultaneously: 1) soar toward the basket holding the ball in one hand, 2) extend his arms and legs away from his torso to clearly display an outline of his body parts and 3) avoid stepping on me. He did about between 50 and 60 lay-ups while I lay on the ground under him and the basket, shooting up at the sky. As he got tired, he had to concentrate a little extra to avoid landing on me after laying the ball in. For dramatic effect, I used high contrast to make his image extra black, and added a black border.

3 Tips:
1) A silhouette can make an ordinary activity far more dramatic.
2) Successful silhouettes require that the background have about four times (or two f-stops) more light on it than the subject in the foreground.
3) The subject’s shape and form must be distinctly defined to create a strong silhouette picture.

Friday, June 18, 2010

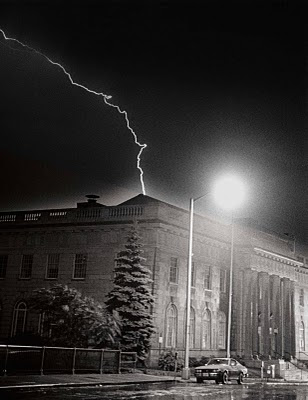
Lightning Strikes

This week's photo captures lightning bolts crackling over a summer sky. The biggest challenge when photographing lightning is to anticipate when and where it will occur -- the shooting is the easy part!


Large lightning bolt crackles around Lowell, Ma. Courthouse during summer thunderstorm (© Michael Maher, The Lowell (Ma.) Sun).

The Photo:
Thunder was booming and lightning crackled brightly across the Lowell, Ma. summer night horizon, but getting photos of these spectacular lightning bolts would not be easy. I had to guess where in the sky the next lightning bolt would occur, anticipate the moment when it would flash, determine the most appropriate camera settings, and take my photos quickly, before the storm passed. To more easily capture lightning bolts that appeared unpredictably in numerous spots of the sky, and keep almost everything in focus, I used a wide-angle lens (35MM set at f4.0 or higher). However, rather than take the easier wide photo of lightning over the city skyline, I attempted a more difficult close-up of bolts flashing over one building (see red box). To avoid getting my camera equipment wet from the heavy rain, I stood in an open doorway, and aimed over the building across the street where the last lightning bolts flashed.
I then set the shutter speed on “B” so I could hold the shutter open for the full duration of the lightning bolts. To avoid moving the camera and blurring my pictures, I mounted my camera on a tripod and connected a cable release so I wouldn’t have to touch the camera when I fired the shutter.
When it was time to take the photo, I closely watched the horizon where the camera was pointed, counting the seconds between the lightning flashes and thunder sounds to determine if the storm was getting closer. I anticipated the next lightning flash as best I could, and whenever I expected lightning, I pushed down on the cable release and kept the camera shutter open until the flash was over. Despite perfect planning, I still needed some luck -- I shot 72 photos and captured lightning in just a few pictures -- but this one great shot was all I needed.

3 Tips:
1) Lightning should be photographed in the upper portion of your image while including a ground, building or skyline element in the bottom of the picture.
2) Use a wide-angle lens pointed at a wide swath of the skyline because the bolts can appear in almost any part of the sky.
3) To capture the lightning bolt, put your camera on a tripod, set the shutter to “B”, use a cable release, and hold the shutter open for long durations.