Search This Blog

Saturday, June 26, 2010

Sky Driver

A silhouette photo portrays a subject's very dark shape against a bright background. Let's take a look at how it is done.


Playground basketball player Joseph Kaplan is silhouetted as he drives for the hoop in Malden, Ma. (© Michael Maher).

The Photo:
I watched a lone player shooting baskets on a playground, and tried to come up with a way to make such a mundane activity visually interesting. The setting sun in my eyes gave me the idea to create a silhouette of the player laying the ball into the basket. As the sun set, it minimized the light on the playground and my basketball player, but still maintained a bright sky, so I lay on the ground under the basket and used the sky as my background. A silhouette requires a background approximately four times (two f-stops) brighter than the foreground. To make this a great picture, I needed the player’s arms and legs to be fully extended, creating a silhouette that clearly outlined all the key body parts (head, torso, two legs, two arms, etc.). It was challenging for me to fit him, the ball, and the basket into the frame, but he had the toughest job, for he had to simultaneously: 1) soar toward the basket holding the ball in one hand, 2) extend his arms and legs away from his torso to clearly display an outline of his body parts and 3) avoid stepping on me. He did about between 50 and 60 lay-ups while I lay on the ground under him and the basket, shooting up at the sky. As he got tired, he had to concentrate a little extra to avoid landing on me after laying the ball in. For dramatic effect, I used high contrast to make his image extra black, and added a black border.

3 Tips:
1) A silhouette can make an ordinary activity far more dramatic.
2) Successful silhouettes require that the background have about four times (or two f-stops) more light on it than the subject in the foreground.
3) The subject’s shape and form must be distinctly defined to create a strong silhouette picture.
Friday, June 18, 2010

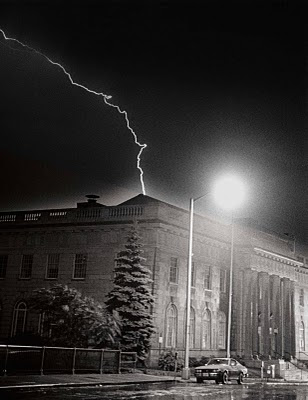
Lightning Strikes

This week's photo captures lightning bolts crackling over a summer sky. The biggest challenge when photographing lightning is to anticipate when and where it will occur -- the shooting is the easy part!


Large lightning bolt crackles around Lowell, Ma. Courthouse during summer thunderstorm (© Michael Maher, The Lowell (Ma.) Sun).

The Photo:
Thunder was booming and lightning crackled brightly across the Lowell, Ma. summer night horizon, but getting photos of these spectacular lightning bolts would not be easy. I had to guess where in the sky the next lightning bolt would occur, anticipate the moment when it would flash, determine the most appropriate camera settings, and take my photos quickly, before the storm passed. To more easily capture lightning bolts that appeared unpredictably in numerous spots of the sky, and keep almost everything in focus, I used a wide-angle lens (35MM set at f4.0 or higher). However, rather than take the easier wide photo of lightning over the city skyline, I attempted a more difficult close-up of bolts flashing over one building (see red box). To avoid getting my camera equipment wet from the heavy rain, I stood in an open doorway, and aimed over the building across the street where the last lightning bolts flashed.
I then set the shutter speed on “B” so I could hold the shutter open for the full duration of the lightning bolts. To avoid moving the camera and blurring my pictures, I mounted my camera on a tripod and connected a cable release so I wouldn’t have to touch the camera when I fired the shutter.
When it was time to take the photo, I closely watched the horizon where the camera was pointed, counting the seconds between the lightning flashes and thunder sounds to determine if the storm was getting closer. I anticipated the next lightning flash as best I could, and whenever I expected lightning, I pushed down on the cable release and kept the camera shutter open until the flash was over. Despite perfect planning, I still needed some luck -- I shot 72 photos and captured lightning in just a few pictures -- but this one great shot was all I needed.

3 Tips:
1) Lightning should be photographed in the upper portion of your image while including a ground, building or skyline element in the bottom of the picture.
2) Use a wide-angle lens pointed at a wide swath of the skyline because the bolts can appear in almost any part of the sky.
3) To capture the lightning bolt, put your camera on a tripod, set the shutter to “B”, use a cable release, and hold the shutter open for long durations.